Creative Coding I: Design & Communication
Prof. Dr. Lena Gieseke | l.gieseke@filmuniversitaet.de | Film University Babelsberg KONRAD WOLF
Script 02: Setup
Script Update History:
| Date | Change | | ——– | ————————- | | 01-12-24 | Markdown, IDEs | | 12-01-25 | JavaScript, A Local Setup | —
- Creative Coding I: Design \& Communication
- Script 02: Setup
-
[ 12-01-25 JavaScript, A Local Setup ](#-12-01-25–javascript-a-local-setup-) - Markdown
- Development Environment
- JavaScript
- Example: A Local Setup For p5.js
-
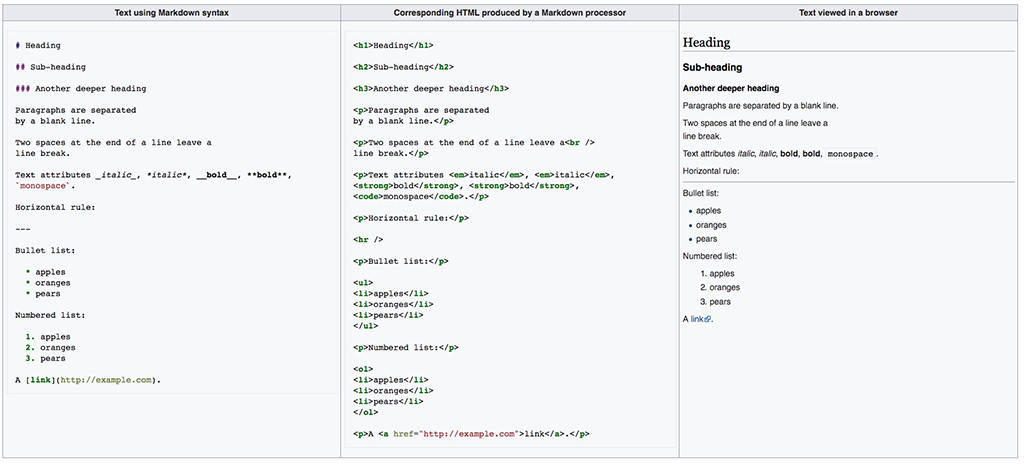
Markdown
Lecture scripts and assignments are written in Markdown (.md). This setup let’s you edit the lecture scripts in an editor, e.g. for making notes. You also have to submit markdown files in the assignments.
- Markdown is a popular markup language that converts text to html.
- Markdown allows you to use an easy-to-read, easy-to-write plain text format, then converts it to structurally valid XHTML (or HTML).
- Github can render markdown. Be aware though that there are different markdown parser (“converter”) and what you can do e.g. with a Visual Studio Code plugin for setting and displaying formulas might not be the same as what GitHub can display.
Resources
Development Environment
Editor
You must have an editor with that you feel comfortable with for writing code and text (Word will not work 🙃). There are many, many options.
Editors and IDEs (Integrated Development Environment) differ mainly on the spectrum of how general-purpose to specialized (e.g. for one specific language) they are, how customizable and whether they are freeware or not. Some popular choices are:
- Visual Studio Code
- JetBrains Editors
- Sublime
- Atom
- Notepad++
- Netbeans
- Visual Studio
- Eclipse
- XCode
- Emacs
- Vim
Visual Studio Code
My personal recommendation is Visual Studio Code (in short VSCode). I like it because I can write different types of languages with it while still having many language specific features (e.g. through extensions). Also, I am totally addicted to customizing my working environments to exactly the way I like it and VSCode let’s me do so in a convenient way (also mainly enabled through extensions). In summary, it is:
- Free
- Multi-purpose
- Extensively adjustable
On a side note: For C++ I so far have only used XCode and Visual Studio (not the same to “Visual Studio Code”!) and I don’t know yet how well you can setup Visual Studio Code for C++.
You can ignore the following section if you work with a different development environments.
Resources
Workspace
VSCodes workspaces might be be confusing in the beginning.
You organize your work in VSCode with workspaces. Think of a workspace as a project. Under the hood it is nothing more than telling VSCode which folders to display together in your VSCode Explorer (the sidebar to the left). Also, you can create individual settings for each workspace (yay, colors! 😊). You can for example have a cc1 workspace and add all files and folders that should be accessible through VSCodes explorer.
I am giving you an example workspace setup, including GitHub, in Script 3: GitHub - Working With the Class Repository
Markdown
For Visual Studio Code I recommend the extension Markdown All in One.
Open the .md file in Visual Studio Code and edit it up to your liking. VSCode gives you the option of an interactive preview of the html rendering of the file:
- Open the command palette with
Shift + Option + por underView -> Command Palette... - Start typing
Markdown: Open Previewand select that command (I also have a hotkey for that because I use it so often).
Resources
GitHub
VSCode comes with all basic functionality to work with Git and GitHub integrated and there are also various plugins for it. For example, I am using the plugins GitHistory and Markdown Preview GitHub Styling next to the functionality VSCode comes with. But I am sure that there are plenty of other great plugins, I simply do not know about.
Once again, please refer to Script 3: GitHub - Working With the Class Repository for in depth explanations.
Resources
Summary
When working with VSCode, I recommend that you know
- how to setup and work with a workspace,
- how to adjust preferences,
- how to install extensions, and
- how to work with the command palette.
Optionally, depending on your workflow, know:
within VSCode.
Terminal / Console
(in the following whenever I say terminal substitute that word with console if on Windows)
We will make use of the terminal at some point!
Start to get familiar with it as soon as possible…
The terminal is an interface in which you can navigate and access files on your computer and execute text-based commands. There are many programs and functionalities which are only available for the terminal. The terminal has the advantage that you do not need to program a graphical interface for your functionality and that you can use terminal commands as source code and build programs from combined terminal commands.
In general, if you use a computer regularly, I recommend to get familiar with at least the most basic terminal commands. As motivation also keep in mind that when you use the Terminal you look really techy and you can impress friends and family!
- MacOs
- Uses a version Unix under the hood, hence all “Mac commands” are actually “Unix commands”
- I use iTerm as command line tool with the Oh My ZSH framework and zsh as shell and powerlevel9k as theme. This gives me some advanced features (remember, I like customization…🙄). But don’t bother with adjusting the terminal right now, the regular Terminal is just fine.
- Windows
- If you want to get more serious about using the command line in Windows, consider the PowerShell.
Basic Commands
At the most basic level, you must be familiar with navigating your files and executing commands with the terminal.
Let me say it again because it is important:
You must be familiar with navigating your files and executing commands with the terminal.
(I was considering all caps here for emphasis. But then again, I really dislike using capitalization and screaming at someone in typography - so please understand the importance of this as is…)
Navigation
The first thing, you need to understand is:
At all times you are somewhere in your folder structure with the terminal.
The line at or above the curser indicates where you are currently. If you execute commands, they are executed at that folder destination.
Change Location
Change current folder
cd foldername
Sub-folder names must be separated by a backslash in Windows and a slash for a Mac.
cd Windows\System32
cd Documents/filmuni
You use .. to go up one folder
cd ..
Know Where You Are
Unix
pwd
Windows
cd (without any parameters)
Example iTerm on Mac:

Command Execution
Next the core terminal commands, such as cd, you can use command line tools such as ffmpeg or git. These command line tools often accept arguments to further specify their functionality. How to use these arguments can be confusing as they really depend on the specific command/tool and how the developers set it up. If in doubt, check the documentation of the command.
There are several formats for specifying arguments and it depends on the tool and the arguments. Sometimes you simply list arguments separated by a space (with more than one argument the right order of the commands is crucial) but usually you indicate the type of argument with a hyphen plus some characters. A hyphen plus some characters are also used for setting optional specifications for a command.
For example to convert a .tif file to a .jpg file:
ffmpeg -y -i test.tif out.jpg
ffmpeg: the name of the command (must be installed though)-y: is an optional setting, which means that you will overwrite the output file if it exists without the system asking again.-i test.tif: the-istands for input and takes as following string the input fileout.jpg: is the output file and must be the last argument
Often you can give the type of argument for the command in two formats, a short version and an equivalent long one:
- single-letter options are listed with a single hyphen such as
-r - word-based options are listed with a a double hyphen such as
--reverse
Usually command line tools are documented, which you can access with the option -h or --help:
ffmpeg -h or ffmpeg --help
Once again, please keep in mind that it is usually highly relevant where you are navigated with your terminal. Where ever you are that is where an command is executed.
Example Mac

Unfortunately for Windows commands slightly differ. For Windows have a look at this basic introduction.
Visual Studio Code
VSCode integrates a terminal as well. You can access it under Terminal -> New Terminal. All command line commands I am mentioning from now on, you could also execute in the VSCode Terminal.
Git and GitHub
For this class you will need to know
- how to regularly get the latest version of the course materials on GitHub (there might be updates to already uploaded files), and
- how to upload your homework.
In the very least, you will need a workflow for these two scenarios. Which means that you should have a basic understanding of git and GitHub and you should know
- the general idea of version control systems,
- the difference between git and GitHub,
- what a repo is, and
- how to get and upload materials from a repo.
This means specifically, you need to be able to
- clone the
lecture_creative_coding_1repo to your computer, - know how to
addandcommitfiles to git locally, - know how to
pullandpushfiles from the online GitHub repo.
How you do this is up to you. If you have a working setup you can stop reading here. If not or if you want further information, please work through Chapter 2: GitHub.
Summary
- Know how to write Markdown.
- Decide on a development environment.
- Know how to navigate and execute commands with the terminal.
- Know how to get the course material from GitHub and upload your homework.
JavaScript
For working with JavaScript locally you need:
- a webserver,
- the JavaScript library files you want to use (in our case the
p5library), and .html,.cssand.jsfile(s).
Webservers
The main job of a web server is to display website content through storing, processing and delivering webpages to users. A web server operates special web server software. This software controls how a user accesses files that the web server hosts. All computers that host websites must have web server software.
When developing a website, we want to be able to see dynamic content of a webpage the same way the end user would, while still working on it locally without hosting it online. For that we must imitate the behavior of a web server on our computer. This is called a local webserver.
Luckily, VSCode make this super simple for us. We can just install a suitable extension and that’s it. The extension let’s us run a webserver locally. For that install the Live Server extension. This will add a “Go Live” button to your VSCode interface and opens automatically a live server at the root of your workspace. Please read through the package’s documentation for more explanations.
Localhost
The URLs that is started locally, when the app is not hosted with, e.g., an external service, but with, e.g., VSCode’s Live Server, is set from express to http://127.0.0.1, which is also called localhost.
localhost is the name given to the local machine that you are working on. Usually its Internet protocol (IP) address is 127.0.0.1. However you can define your IP to be anything, so it might be a different address. The address is used to establish an connection to the same machine or computer being used by the client.
127.0.0.1 and localhost are the same thing. You can imagine these addresses as meaning “this computer”.
You add a port number by adding a : followed by the number, e.g., localhost:3000.
Ports
The :3000 part is the TCP port. Ports are communication endpoints on a particular IP address (in the case of localhost - 127.0.0.1). Ports enable to run several servers (for example for different purposes such as file sharing, web serving, printing, etc) from the same machine (one single IP address).
You can imagine it as the following. In an apartment building, there is one address for multiple apartments. The address is a host, e.g. the localhost. Each apartment has its own mailbox, hence each mailbox is a port.
Example: A Local Setup For p5.js
p5.js is a JavaScript library that integrates a Processing sketch and its functionalities into a webpage. P5 has around 200 easily understandable commands. There is a p5.js web editor, which is under active development. To use it you need to create an account at the website.
For creating a basic p5.js project locally you need a
- the p5.js library files,
- a .html, .css and sketch.js file,
- run a webserver, and
- a browser to display the result.
As a webserver, I assume Visual Studio Code’s Live Server extension.
Getting the Library Files
There are two options to work with library files, such as p5.js:
- Download a local copy of the library files
- Link to a online version of the files
Local Library Files
You can download the p5.js library file on the p5 website.
You can put those files somewhere “global” and access the same files from anywhere on your computer, such as:
- projects
    - lib
        - p5.js
    - proj1
        - index.html
        - sketch.js
    - proj2
        - index.html
        - sketch.js
    - ...
The above has the advantage that you do not have multiple copies of the library files lying around. It has the disadvantage that it is not clear which project uses which libraries. E.g., different projects might rely on different versions. The alternative is to work as follows:
- projects
    - proj1
        - lib
            - p5.js
        - index.html
        - sketch.js
    - proj2
        - lib
            - p5.js
        - index.html
        - sketch.js
    - ...
The above has the advantage that you always have a working copy with the correct library files of all projects at all times. Ultimately this is up to personal requirements and taste.
Online Library Files
You can also link to an online repository. If you chose an online file, obviously you have to be online when working on the project 🤯.
For an online version of the library you can use an absolute path to:
https://cdnjs.com/libraries/p5.js
Minified Library Files
For javascript libraries you usually also have a minified version .min.js. For p5 it is p5.min.js. It has absolutely the same functionality as p5.js but it is minified, meaning it is made smaller. Minified versions have all unnecessary characters removed in order to reduce the file size and make it faster to load. It is recommended to use this compressed version in a production environment.
If you are still developing your site, work with the p5.js as you can read the source code when necessary.
Linking Library Files
In its most basic setup, in order to work with the p5 library you have to have a basic html document structure and a line that points to the p5 library files with the script html tag:
<!DOCTYPE html>
<html>
    <head>
        <meta charset="UTF-8">
        <title>Title of the document</title>
    </head>

    <body>
        <!-- Html Elements... -->

        <!-- LOCAL LIBRARY FILES:-->
        <script src="../lib/p5.js"></script>
        <script src="sketch.js"></script>
    </body>

</html>
You can link to the library files with a relative path to any location of your liking.
If you want to use a online repository of a library, the linking would look as follows:
<!DOCTYPE html>
<html>
    <head>
        <meta charset="UTF-8">
        <title>Title of the document</title>
    </head>

    <body>
        <!-- Html Elements... -->

        <!-- ONLINE LIBRARY FILES: -->
        <script src="https://cdnjs.cloudflare.com/ajax/libs/p5.js/1.1.9/p5.js"></script>
        <script src="sketch.js"></script>
    </body>

</html>
On a Side Note: It is best practice to load JavaScript script files after the html content in the body. The script files might take longer to load and if you put them below the html, the html elements will be displayed first and the user sees already a website even if the scripts are still loading. In my examples I might forget about this order once in a while though, and might have the scripts in the header. Also “on the internet” you will see the lading of the script files in the header a lot.
The Sketch File
Traditionally p5 work files are called sketch.js but you can also name it any way you like. You also have to include this file in your index.html after loading the library as you are using commands from the p5.js library in the sketch.js.
<!DOCTYPE html>
<html>
    <head>
        <meta charset="UTF-8">
        <title>Title of the document</title>
    </head>

    <body>
        <script src="../lib/p5.js"></script>
        <script src="sketch.js"></script>
    </body>

</html>
A basic sketch.js could look like (no news here…):
//called once upon loading the site
function setup()
{
    createCanvas(windowWidth, windowHeight);
    background(200);
}

//called by default 60 times per second
function draw()
{
    //Add the drawing of a frame here
}
This creates a canvas of the size of the innerWidth browser property (system variables from p5) with a gray background.
Running a Local Server
VSCode

Pushing the button will open a browser, navigated to the folder that is the root of your VSCode workspace. From there navigate to the folder of the project, you want to display, containing the index.html, linking to the sketch.js. Opening that folder should display your sketch automatically.
Workflow
With the above setup in place you can now work on the source code, e.g. in the sketch.js file, in VSCode, which is much more comfortable. To see your results make sure that your webserver is running and take a look at the open page in the browser (you might need to refresh the page, but usually that is done automatically).
Static vs. Interactive Mode
If you would open the index.html file with the Open File... command in your browser, you will see exactly the same page for this example as there is no complex interaction (the files are static). However this file loading is very different from working with an actual web server (which is ultimately the goal), which enables sending data back and forth between server and browser. This will become apparent in more sophisticated examples. In general, for best results, ensure that your development environment matches your deployment environment. That means doing your development using a web server process rather than simply opening static files.
[Steck Overflow: Difference between Localhost and opening html file]
Browser
For this class I am using the Firefox Browser (#unfcktheinternet). However, Google’s Chrome is as of now the most powerful and reliable browser in my opinion but I do not agree with Google’s business model and try to avoid using their products. However, at some point I might use Chrome and I recommend to have it on your machine just in case. Also, feel free to use any browser you like, but commands and behaviors are different in different browsers. If you want to make your life easier, use Firefox as well for this class.
Generating content, which runs reliably across all standard browsers is a complicated tasks. We are not getting into that in this class. This class aims at giving you the basics of web development and the goal of prototyping.
Browser Console
Remember that the browser is running our JavaScript code. Hence possible error messages are given from the browser. The browser is telling us errors through the browser Console.
Most browser Consoles are REPL, which stands for Read, Evaluate, Print, and Loop. This means that you can also type in JavaScript directly into the Console, it evaluates your code, prints out the result of your expression, and then loops back to the first step.
The Console is part of the Development Tools and you can access the Development Tools in Firefox by pressing Command+Option+I (Mac) or Control+Shift+I (Windows, Linux). You can do proper debugging with the Development Tools but for now we are only interested in reading any error messages we might get from the Console.
Usually, I just keep the console open while developing JavaScript.
You can see an example error message in your console when opening the bug.html page.

![[source]](https://s3-us-west-2.amazonaws.com/s.cdpn.io/80625/commands-03.jpg)
Resources
Print Outs
You can print to the Console of the browser with the Console method log(). The message may be a single string or it may be any one or more JavaScript objects.

Alternatively you can use alert(), which prints to a newly opened message window.
Favicons
Your browser might give you the following error message
GET http://127.0.0.1:8080/favicon.ico 404 (Not Found)
E.g., Chrome expects a favicon for every webpage.
A favicon is a small image or collection of small images that are associated with a website or webpage. Favicons are displayed by a web browser next to the title of the website or webpage in the address bar, the browser tab, and the bookmarks bar.

The easiest solution is to put an icon file favicon.ico in the p5 folder (or wherever the root of your webpage is, meaning where you start your server), adding this line to the index.html:
<link rel="shortcut icon" type="image/x-icon" href="favicon.ico">
In total:
<!DOCTYPE html>
<html>
    <head>
        <meta charset="UTF-8">
        <!-- FAV ICON: -->
        <link rel="shortcut icon" type="image/x-icon" href="favicon.ico">
        <title>Title of the document</title>
    </head>

    <body>
        <!-- Html Elements... -->

        <!-- ONLINE LIBRARY FILES: -->
        <script src="https://cdnjs.cloudflare.com/ajax/libs/p5.js/1.1.9/p5.js"></script>
        <script src="sketch.js"></script>
    </body>

</html>
You can get icons from the https://favicon.io/. You can also generate icons from image files with the following line:
<link rel="icon" type="image/png" sizes="32x32" href="/favicon-32x32.png">
Paths to Resources
You can link to a resource such as a library or images with absolute or relative paths.
An absolute path is built starting from the system root, e.g.
<img src="http://www.foo.com/kitten.png"/>`
or
/Users/legie/projects/myproject/kitten.png
When pointing to online resources, which are not hosted by you on your webserver you need absolute paths.
However, if it is your own resource locally and maybe belonging to a specific project, you should always use relative paths in relation to your project. How to specify paths is relevant for all assets and library files. Relative path take as reference for example a working directory or a project root. If you are working with a webserver, the location where you start the server will be root for the relative paths, however if you access files from other files, e.g. the index.html, your must create a path in relation to that file.
For relative path you need to know the following syntax. For this example, let’s say you have the root of a project under
/Users/legie/projects/myproject/
and have a html file under
/Users/legie/projects/myproject/index.html
Now you want to show an image on your webpage and the question is how do you create a path to that image file? This depends also on the location of the image.
<img src="kitten.png"/>
- Above, the image file is in the same folder as the file containing this line of code.
- E.g.
/Users/legie/projects/myproject/kitten.png
<img src="img/kitten.png"/>
or
<img src="./img/kitten.png"/>
- Above, the image file is inside a ‘img’ folder, which is in the same folder as the file containing this line of code.
./means that it is the same folder- E.g.
/Users/legie/projects/myproject/img/kitten.png
<img src="../img/kitten.png"/>
- The image file is inside an ‘img’ folder one folder higher than the file containing this line of code.
../means to go up one folder- E.g.
/Users/legie/projects/img/kitten.png
For example, you could use one image folder for all projects (e.g., I was using the same images over and over again in different projects):
- projects
    - lib
        - p5.js
        - p5.min.js
        - p5.sound.js
    - img
        - kitten.png
    - proj1
        - index.html
        - sketch.js
    - proj2
        - index.html
        - sketch.js
    - ...
Again, I am not saying that the above is the best setup. It is just an example. Please feel free to use your own brain to come up with the best setup for you.
The above means in sketch.js, we need to access the image file kitten.png with, e.g.:
let img;

function preload()
{
    img = loadImage("../img/kitten.png");
}

function setup()
{
    createCanvas(img.width, img.height);

    noLoop();
}

function draw()
{
    image(img, 0, 0);
}
Also, it is important to understand that whenever you use a webserver, the server will be the root of a webpage and you can never go further up than where you started the local webserver.
Let’s say you have the projects /Users/legie/projects/myproject1/ and /Users/legie/projects/myproject2/. Now you started the webserver under /Users/legie/projects/myproject1/. From there you will not be able to go to /Users/legie/projects/myproject2/. You can only access what is under /Users/legie/projects/myproject1/.
I recommend that you come up with a file structure once and stick with it.
Please keep in mind that for the actual deployment of a real-world website a slightly different folder and file structure will be needed. This is not relevant as this point but be already aware of it. For a project, which should be deployed online, you will probably have a structure as the following:
page/myproject1/page/myproject1/server.jspage/myproject1/package.jspage/myproject1/publicpage/myproject1/public/index.htmlpage/myproject1/public/sketch.jspage/myproject1/public/lib/page/myproject1/public/dataetc.
Then starting locally the node server under myproject1 for the correct behavior.
CSS
Not necessarily needed at this point but for the sake of completeness, let’s also add a .css stylesheet to our project:
html, body
{
    margin: 0;
    padding: 0;
}

canvas
{
    display: block;
}
margin: space around elements, outside of any defined borders.padding: space around an element’s content, inside of any defined borders.display: sets or returns the element’s display type.- Elements in HTML are mostly
inlineorblockelements: An inline element has floating content on its left and right side. A block element fills the entire line, and nothing can be displayed on its left or right side.
- Elements in HTML are mostly
Put the .css into the project folder, e.g.
- projects
    - proj1
        - favicon.ico
        - index.html
        - sketch.js
        - style.css
    - proj2
        ...
Add to the header of the index.html
<link rel="stylesheet" type="text/css" href="../css/style.css">
<!DOCTYPE html>
<html>
    <head>
        <meta charset="UTF-8">
        <!-- FAV ICON: -->
        <link rel="shortcut icon" type="image/x-icon" href="favicon.ico">

        <!-- STYLE SHEET: -->
        <link rel="stylesheet" type="text/css" href="style.css">

        <title>Title of the document</title>
    </head>

    <body>
        <!-- Html Elements... -->

        <!-- ONLINE LIBRARY FILES: -->
        <script src="https://cdnjs.cloudflare.com/ajax/libs/p5.js/1.1.9/p5.js"></script>
        <script src="sketch.js"></script>
    </body>

</html>
The End
🛠 🧰 ⚙️